Building Project Posts
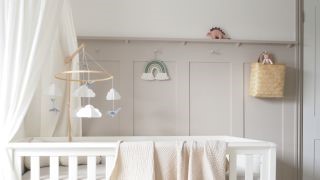
DIY wall panelling is a hot trend right now, and it comes in a variety of designs, so there’s something for everyone. One of the reasons it’s so popular is that it’s fairly easy to install, but it’ll completely change your room. It comes in various styles, from contemporary slats to a more conventional Shaker style.
Here’s everything you need to know about bringing characterful DIY wall panelling into your room, from cutting the strips to installing them, as well as some useful finishing techniques.
The tools you’ll need:
As previously said, the first thing you’ll need is a vision of how you want your house to look. Do your homework and pick the panelling that best represents your style and how you spend your life. To complete the task properly, you’ll need the following materials and tools:
- Your choice of wall panels
- A notepad in which to scribble and draw ideas
- A strong adhesive
- A level
- Something to use to cut the panels (depends on the type of panelling)
- With Hammer, sand something
- Pin
- A can of paint (if necessary)
- Measurement tape (the longer, the better)
- For quick cleanup, use a dropcloth.
And now you’re ready to get started!
Plan everything in person:
Plan your wall in person, then place your order for your panels and wait for them to come. If you’re obtaining wood panelling that differs from panel to panel, you might want to plan out the wall before you start putting it up. To observe how the panels interact with each other, once they have arrived, arrange everything on the floor in the same pattern that will be on your wall. In-person, things might appear to be somewhat different. Don’t cut anything, just in case you want to switch out the panels later.
Make your cuts:
Once you’re satisfied with the panels, you’ll need to cut them out. You may cut them yourself or hire someone to do it for you. You can skip this step if your panels do not require trimming, for example, if you ordered bespoke sizing.
It’s critical to make nice, straight, and clean cuts. Any differences in dimensions should be avoided since even one crookedly cut panel might throw everything off. After you’ve finished making your cuts, sand everything down.
Apply your DIY panels:
Start by putting up panels from the outer edges of your walls and working your way in. Apply the base panels first, followed by the top panels. To keep your lines straight, draw everything out with a pencil, but also use a level to ensure it is straight. Apply the strong adhesive to the back of the card and firmly push it down. Hold the panel in place for a few seconds before removing it and letting it dry.
Continue to add panels one by one, beginning with any vertical ones and working your way down to horizontal ones. You may make changes as you go to achieve the style and feel you like. Just make sure you keep checking with the level if you’re utilising straight lines. You can never have too many double-checks throughout this process.
Allow it to dry:
While most adhesives dry fast, you should wait a few days for them to attach before fully moving on to the next step. After that, you may paint portions of the panelling, add any additional items such as pegs, or enjoy it like any other wall.
Conclusion:
At the end of the day, we all want to add individuality to our houses, and DIY wall panelling is a terrific way to make a modest modification that will make you fall in love with your home design – or make new builds look older and full of character. Get the best DIY panels and anything else you might need for your home project, contact timber specialists, Camertown Timber!
Latest posts


